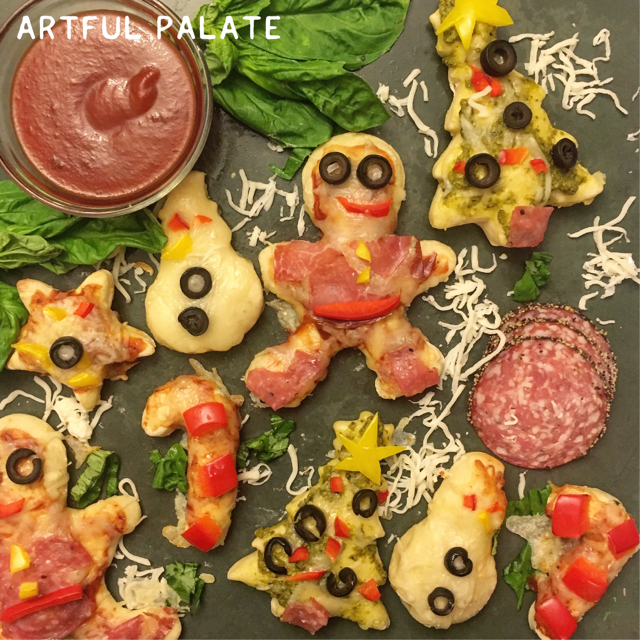
Watching the awe and wonder in my kids’ eyes during the holiday season is one of my absolute favorite things! I am so thankful God gave us the ability to show joy and to be warmed by the joy in others! As a parent it’s so special to see our children get truly excited about something…even as simple as lighting the tree, holiday cookie decorating…or pizza decorating! I love to be witness to their enthusiasm at an accomplishment too, like creating a meal with me. This specific meal is one that gets them excited from the start: making the dough themselves, choosing their Christmas themed shapes and assembling the mini pizzas. I even have to turn the oven light on during the baking process so they can watch. Whenever the kids help prepare food they are also more excited to help set the table and present it to the rest of the family to enjoy. When they help make it there is also much less discussion about actually eating their whole meal. Haha
These mini pizzas also make an easy lunch to bring to school the next day!
This one is super fun because they get to pick out their own shapes (using basic cookie cutters) and the best part is they like to load them up with vegetables, because, well it adds more color, art and activity to the whole project!

Ingredients
BASIC PIZZA DOUGH
- 3 1/2 flour, plus more for rolling out (unbleached white, whole wheat or gluten free flour of your choice)
- 1 envelope yeast
- 1 tsp cane sugar
- 2 tsp sea salt
- 1 1/2 cups water, approx. 110 degrees F (I use my candy thermometer and run it under the water until it reaches this temp.
- 3 Tbs olive oil
[/ingredients]
FAVORITE OPTIONAL TOPPINGS (OR CHOOSE YOUR OWN) :
Ingredients
- Mozzarella cheese
- Sliced black or green olives
- Diced bell peppers
- Sliced meats of choice like salami, pepperoni or ham
- Pineapple chunks
- Diced Zucchini
- Sliced mushrooms
- Chopped fresh basil leaves or chopped spinach[/ingredients]
Directions
- I prefer a stand mixer for mixing the dough, but you can do this mixing process by hand as well. Combine the flour, sugar, yeast, and salt in the bowl of your mixer. Alternatively, use a regular bowl and just knead dough together.
- While the mixer is running, add the water and 2 Tbs oil
- Beat with the dough hook until a ball of dough is formed. If it’s too sticky, add a little more flour. If it’s too dry, add a little more water, just a spoonful at a time. If doing this process by hand, follow this same system until you have a ball of dough.
- Scrape the dough onto a lightly floured surface and gently knead into a smooth, firm ball.
- With 1 Tbs oil grease, a bowl at least double the size of your current dough and place dough in it.
- Cover with plastic wrap or a cloth and keep on the countertop. Allow dough to sit until it doubles in size. It should take at least an hour, but more depending on temperature and other factors.
- Once the dough is doubled, put the dough on a lightly floured surface and divide it into 2 equal pieces. Cover each with a kitchen towel or plastic wrap and let them rest for 10 minutes.
- Meanwhile, you can preheat your oven to 425′
- Then use a rolling pin flatten dough to about ¼” thick or as thick as you like.
- Cut out shapes with sharp cookie cutters.
- Let kids assemble in layers: sauce or oil, a bit of cheese, toppings, then a little more cheese if you like.
- Place your mini pizzas onto a greased baking sheet or lightly floured pizza stone.
- The time it will take to bake depends on how big or thick your cut shapes are, but probably somewhere between 7-10 minutes.

